本文最后更新于:2023年12月13日 下午

测试需要在 Ubuntu 下配置 C++ 开发环境,本文记录配置过程。

Ubuntu 发行版: 20.04

基础工具安装

更新和升级系统软件

1
2
sudo apt update
sudo apt upgrade

安装 build-essential

build-essential 包含了 GNU 编辑器集合、GNU 调试器、其他编译软件所必需的开发库和工具,简单来说,安装了 build-essential 就相当于安装了 gcc、g++、make 等工具。

1
sudo apt install build-essential
  • 查看 gcc 版本:
1
2
3
4
5
# gcc --version
gcc (Ubuntu 9.4.0-1ubuntu1~20.04.2) 9.4.0
Copyright (C) 2019 Free Software Foundation, Inc.
This is free software; see the source for copying conditions. There is NO
warranty; not even for MERCHANTABILITY or FITNESS FOR A PARTICULAR PURPOSE.
  • 查看 g++ 版本:
1
2
3
4
5
# g++ --version
g++ (Ubuntu 9.4.0-1ubuntu1~20.04.2) 9.4.0
Copyright (C) 2019 Free Software Foundation, Inc.
This is free software; see the source for copying conditions. There is NO
warranty; not even for MERCHANTABILITY or FITNESS FOR A PARTICULAR PURPOSE.
  • 查看 make 版本:
1
2
3
4
5
6
7
# make --version
GNU Make 4.2.1
Built for x86_64-pc-linux-gnu
Copyright (C) 1988-2016 Free Software Foundation, Inc.
License GPLv3+: GNU GPL version 3 or later <http://gnu.org/licenses/gpl.html>
This is free software: you are free to change and redistribute it.
There is NO WARRANTY, to the extent permitted by law.

安装 gdb

  • 安装命令
1
sudo apt install gdb
  • 查看 gdb 版本:
1
2
3
4
5
6
# gdb --version
GNU gdb (Ubuntu 9.2-0ubuntu1~20.04.1) 9.2
Copyright (C) 2020 Free Software Foundation, Inc.
License GPLv3+: GNU GPL version 3 or later <http://gnu.org/licenses/gpl.html>
This is free software: you are free to change and redistribute it.
There is NO WARRANTY, to the extent permitted by law.

安装 cmake

  • 安装命令
1
sudo apt install cmake
  • 查看 cmake 版本:
1
2
3
4
# cmake --version
cmake version 3.16.3

CMake suite maintained and supported by Kitware (kitware.com/cmake).
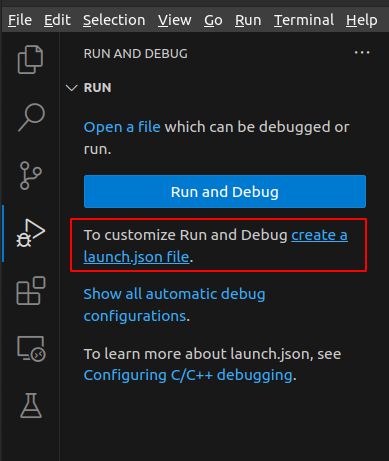
VS Code 环境配置

VS Code 安装

  • 安装 VS Code
  • 在 VS Code 中安装 C/C++ Extension Pack 扩展组件,其他插件会附带安装
  • 我同时也安装了 C/C++,Code Runner, C/C++ Compile Run 扩展

环境配置

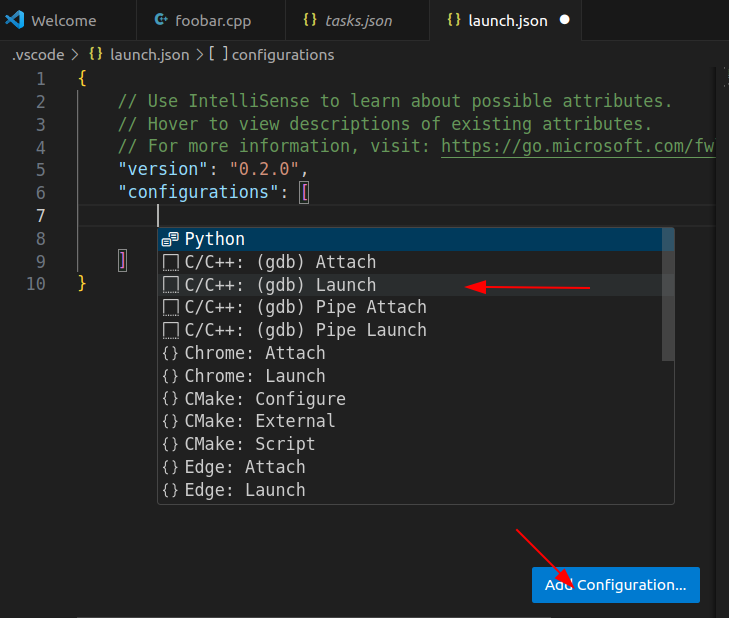
VS Code 与 Visual Studio或其他的大型IDE的工作机制类似,一般都是每个project有一个单独的工作空间(也就是目录),可以为每个工作空间配置定制的环境,也可以配置默认的环境。在配置C/C++开发环境时,基本会配置3个文件,tasks.json、launch.json及c_cpp_properties.json,三个文件都在 .vscode目录下。

编译 tasks.json

为当前工作目录配置编译环境,我们需要创建一个tasks.json文件来告诉VS Code如何来编译源文件,选择 Terminal --> Configure Tasks,然后点击C/C++: g++ build active file,会自动生成一个tasks.json,根据自己的需求来修改,tasks.json是为整个目录配置环境,不需要修改诸如 “${fileDirname}” 这样的变量,“type”可以改成“shell”,不能任意; “label”是task的名称,可以随意,但要与launch.json文件中的变量“preLaunchTask”设置一致; “command” 来指定编译器名,可以不带绝对路径。变量参考详见官方文档

1
2
3
4
5
6
7
8
9
10
11
12
13
14
15
16
17
18
19
20
21
22
23
24
25
26
27
28
{
"tasks": [
{
"type": "cppbuild",
"label": "C/C++: g++ build active file",
"command": "/usr/bin/g++",
"args": [
"-fdiagnostics-color=always",
"-g",
"${file}",
"-o",
"${fileDirname}/${fileBasenameNoExtension}"
],
"options": {
"cwd": "${fileDirname}"
},
"problemMatcher": [
"$gcc"
],
"group": {
"kind": "build",
"isDefault": true
},
"detail": "Task generated by Debugger."
}
],
"version": "2.0.0"
}

调试 launch.json

创建一个launch.json文件来配置调试环境,选择Run --> Add Configuration,会自动生成一个launch.json

点击右下角的Add Configuration来选定要加入的配置C/C++: (gdb) Launch(VS Code版本不同,方式有些变化)

生成默认 launch.json 文件

1
2
3
4
5
6
7
8
9
10
11
12
13
14
15
16
17
18
19
20
21
22
23
24
25
26
27
28
29
30
{
// Use IntelliSense to learn about possible attributes.
// Hover to view descriptions of existing attributes.
// For more information, visit: https://go.microsoft.com/fwlink/?linkid=830387
"version": "0.2.0",
"configurations": [

{
"name": "g++ - Build and debug active file",
"type": "cppdbg",
"request": "launch",
"program": "${fileDirname}/${fileBasenameNoExtension}",
"args": [],
"stopAtEntry": false,
"cwd": "${fileDirname}",
"environment": [],
"externalConsole": false,
"MIMode": "gdb",
"setupCommands": [
{
"description": "Enable pretty-printing for gdb",
"text": "-enable-pretty-printing",
"ignoreFailures": true
}
],
"preLaunchTask": "C/C++: g++ build active file",
"miDebuggerPath": "/usr/bin/gdb"
}
]
}

“program”表示需要调试的文件,下面设置为工作目录 ${fileDirname} 中的 ${fileBasenameNoExtension} ,当foobar.cpp处于打开状态时,编译得到的 foobar 会被调试

1
"program": "${fileDirname}/${fileBasenameNoExtension}",

“stopAtEntry”默认为false, 运行调试时,debugger不会在源文件中添加断点,设置为true时,调试会在main函数入口处等待。

配置补充 c_cpp_properties.json

想要进行更多的配置,例如设置编译器路径、改变C标准等,可以创建一个c_cpp_properties.json文件,使用 ctrl+shift+P 打开命令搜索,找到并选择C/C:Edit Configurations(JSON),会自动创建一个c_cpp_properties.json文件,按自己需要修改变量即可。

1
2
3
4
5
6
7
8
9
10
11
12
13
14
15
16
17
{
"configurations": [
{
"name": "Linux",
"includePath": [
"${workspaceFolder}/**"
],
"defines": [],
"compilerPath": "/usr/bin/gcc",
"cStandard": "c17",
"cppStandard": "gnu++14",
"intelliSenseMode": "linux-gcc-x64",
"configurationProvider": "ms-vscode.cmake-tools"
}
],
"version": 4
}

测试代码

1
2
3
4
5
6
7
8
9
10
11
12
13
14
#include <string>
#include <iostream>

using namespace std;


int main(){
cout << "Hello World ! "<< endl;

return 0;
}

可以单步调试并显示结果。

要加 endl ,否则会延迟输出。

参考资料


文章链接:
https://www.zywvvd.com/notes/coding/cpp/ubuntu/ubuntu-cpp-env/


“觉得不错的话,给点打赏吧 ୧(๑•̀⌄•́๑)૭”

微信二维码

微信支付

支付宝二维码

支付宝支付

Ubuntu 系统配置 VS Code C++ 开发环境
https://www.zywvvd.com/notes/coding/cpp/ubuntu/ubuntu-cpp-env/
作者
Yiwei Zhang
发布于
2023年12月13日
许可协议