本文最后更新于:2024年5月11日 下午
本文记录在Linux服务器更换Nvidia驱动的流程。
需求
Linux 服务器上的 1080Ti 显卡驱动为387, CUDA 9,比较老旧,需要更换成可以运行pytorch 1.6的环境。
确定当前显卡型号\操作系统版本\目标环境
- 查看显卡信息,确定自己的显卡型号:
1 | |
或
1 | |
输出的设备信息并不是我们熟悉的型号,比如我的输出为:
1 | |
其中
Device 1b06即为 1080Ti可以进一步查看左边编号下的显卡信息
1 | |
- 查看系统信息
1 | |
- 查看系统位数
1 | |
- 确定需求的Cuda版本
比如 tensorflow-gpu 的各个版本对Cuda 和 cuDNN 都有自己的要求:
| Version | Python version | Compiler | Build tools | cuDNN | CUDA |
|---|---|---|---|---|---|
| tensorflow-2.3.0 | 3.5-3.8 | GCC 7.3.1 | Bazel 3.1.0 | 7.6 | 10.1 |
| tensorflow-2.2.0 | 3.5-3.8 | GCC 7.3.1 | Bazel 2.0.0 | 7.6 | 10.1 |
| tensorflow-2.1.0 | 2.7, 3.5-3.7 | GCC 7.3.1 | Bazel 0.27.1 | 7.6 | 10.1 |
| tensorflow-2.0.0 | 2.7, 3.3-3.7 | GCC 7.3.1 | Bazel 0.26.1 | 7.4 | 10.0 |
| tensorflow_gpu-1.15.0 | 2.7, 3.3-3.7 | GCC 7.3.1 | Bazel 0.26.1 | 7.4 | 10.0 |
| tensorflow_gpu-1.14.0 | 2.7, 3.3-3.7 | GCC 4.8 | Bazel 0.24.1 | 7.4 | 10.0 |
| tensorflow_gpu-1.13.1 | 2.7, 3.3-3.7 | GCC 4.8 | Bazel 0.19.2 | 7.4 | 10.0 |
| tensorflow_gpu-1.12.0 | 2.7, 3.3-3.6 | GCC 4.8 | Bazel 0.15.0 | 7 | 9 |
| tensorflow_gpu-1.11.0 | 2.7, 3.3-3.6 | GCC 4.8 | Bazel 0.15.0 | 7 | 9 |
| tensorflow_gpu-1.10.0 | 2.7, 3.3-3.6 | GCC 4.8 | Bazel 0.15.0 | 7 | 9 |
| tensorflow_gpu-1.9.0 | 2.7, 3.3-3.6 | GCC 4.8 | Bazel 0.11.0 | 7 | 9 |
| tensorflow_gpu-1.8.0 | 2.7, 3.3-3.6 | GCC 4.8 | Bazel 0.10.0 | 7 | 9 |
| tensorflow_gpu-1.7.0 | 2.7, 3.3-3.6 | GCC 4.8 | Bazel 0.9.0 | 7 | 9 |
| tensorflow_gpu-1.6.0 | 2.7, 3.3-3.6 | GCC 4.8 | Bazel 0.9.0 | 7 | 9 |
| tensorflow_gpu-1.5.0 | 2.7, 3.3-3.6 | GCC 4.8 | Bazel 0.8.0 | 7 | 9 |
| tensorflow_gpu-1.4.0 | 2.7, 3.3-3.6 | GCC 4.8 | Bazel 0.5.4 | 6 | 8 |
| tensorflow_gpu-1.3.0 | 2.7, 3.3-3.6 | GCC 4.8 | Bazel 0.4.5 | 6 | 8 |
| tensorflow_gpu-1.2.0 | 2.7, 3.3-3.6 | GCC 4.8 | Bazel 0.4.5 | 5.1 | 8 |
| tensorflow_gpu-1.1.0 | 2.7, 3.3-3.6 | GCC 4.8 | Bazel 0.4.2 | 5.1 | 8 |
| tensorflow_gpu-1.0.0 | 2.7, 3.3-3.6 | GCC 4.8 | Bazel 0.4.2 | 5.1 | 8 |
pytorch 同样有各个版本对Cuda的要求:
- 我们需要安装pytorch1.6的环境,因此需要10.2 以上的Cuda版本.
- 确定安装的驱动版本:
https://docs.nvidia.com/cuda/cuda-toolkit-release-notes/index.html#cuda-major-component-versions
| CUDA Toolkit | Linux x86_64 Driver Version | Windows x86_64 Driver Version |
|---|---|---|
| CUDA 11.1.1 Update 1 | >=455.32 | >=456.81 |
| CUDA 11.1 GA | >=455.23 | >=456.38 |
| CUDA 11.0.3 Update 1 | >= 450.51.06 | >= 451.82 |
| CUDA 11.0.2 GA | >= 450.51.05 | >= 451.48 |
| CUDA 11.0.1 RC | >= 450.36.06 | >= 451.22 |
| CUDA 10.2.89 | >= 440.33 | >= 441.22 |
| CUDA 10.1 (10.1.105 general release, and updates) | >= 418.39 | >= 418.96 |
| CUDA 10.0.130 | >= 410.48 | >= 411.31 |
| CUDA 9.2 (9.2.148 Update 1) | >= 396.37 | >= 398.26 |
| CUDA 9.2 (9.2.88) | >= 396.26 | >= 397.44 |
| CUDA 9.1 (9.1.85) | >= 390.46 | >= 391.29 |
| CUDA 9.0 (9.0.76) | >= 384.81 | >= 385.54 |
| CUDA 8.0 (8.0.61 GA2) | >= 375.26 | >= 376.51 |
| CUDA 8.0 (8.0.44) | >= 367.48 | >= 369.30 |
| CUDA 7.5 (7.5.16) | >= 352.31 | >= 353.66 |
| CUDA 7.0 (7.0.28) | >= 346.46 | >= 347.62 |
此时我们已经确定了当前环境为 64位 Ubuntu 16.04,显卡 1080Ti
目标 Cuda 10.2 以上,因此需要驱动版本 >= 440.33
下载驱动
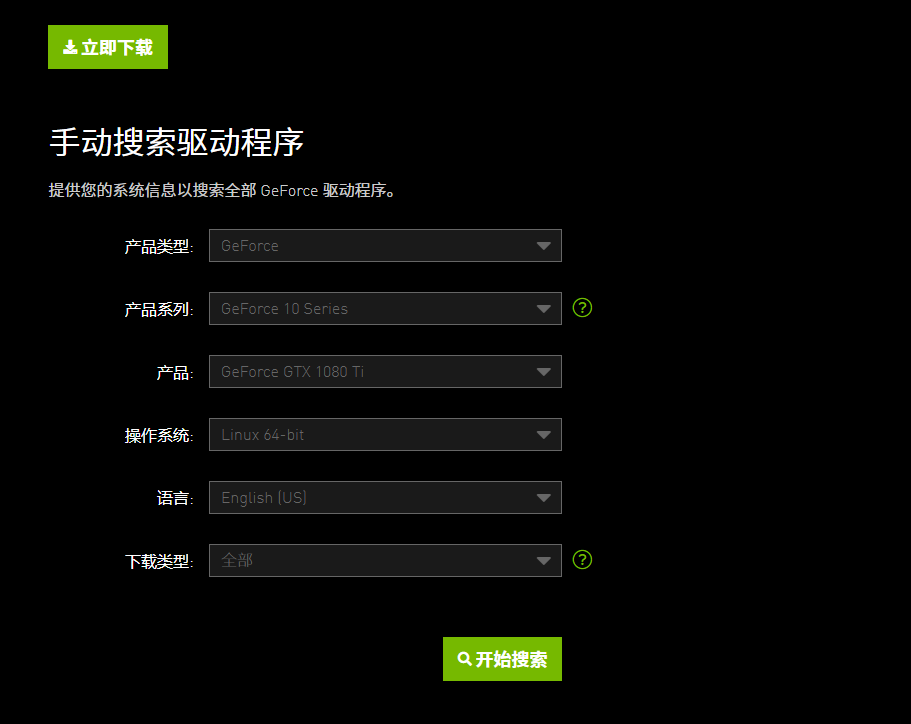
- 在搜索列表中选择合适自己目标的驱动版本(也不建议选择最新的,应用开发有可能跟不上,够用就好)
- 我下载了
NVIDIA-Linux-x86_64-450.80.02.run
安装驱动
需要强调的是我现在的安装环境是Linux服务器,没有图形界面,使用图形界面的同志不要按照此方案安装.
- 卸载已有的驱动
1 | |
- 安装新驱动
1 | |
–no-opengl-files 只安装驱动文件,不安装OpenGL文件
–no-x-check 安装驱动时不检查X服务
–no-nouveau-check 安装驱动时不检查nouveau
查看驱动更新结果
1 | |
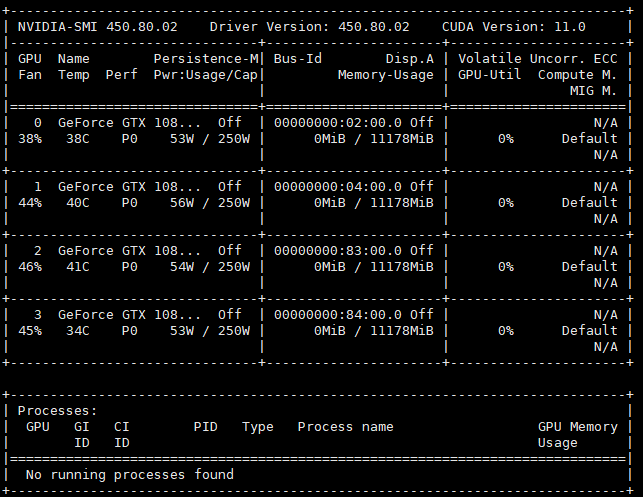
- 更新成功。
参考资料
- https://blog.csdn.net/qq_30163461/article/details/80314630?utm_medium=distribute.pc_relevant.none-task-blog-BlogCommendFromBaidu-2.control&depth_1-utm_source=distribute.pc_relevant.none-task-blog-BlogCommendFromBaidu-2.control
- https://www.cnblogs.com/haiyang21/p/12699593.html
文章链接:
https://www.zywvvd.com/notes/system/linux/driver/nvidia-driver-install-linux/
“觉得不错的话,给点打赏吧 ୧(๑•̀⌄•́๑)૭”

微信支付

支付宝支付