本文最后更新于:2024年1月14日 晚上

一个跟轮廓相关的最常用到的功能是如何匹配多条轮廓。我们或许需要比较两条计算好的轮廓,或者比较一条轮廓和一个抽象模板。这两种情况都会在本文讨论。

  • 相关介绍

  • 比较两条轮廓最简洁的方法之一是比较它们的轮廓矩。轮廓矩代表了一条轮廓、一幅图像、一组点集的某些高级特征。下面的所有讨论对轮廓、图像、点集都同样适用,简便起见,将它们统称为对象。矩的数值定义如下式:

$$
m_{p, q}=\sum_{i=1}^{N} I\left(x_{i}, y_{i}\right) x^{p} y^{q}
$$

在上式中, $ m_{p, q} $ 代表对象中所有像素的总和, 其中每个像素 $ x, y $ 的像素值都乘以因子 $ x^{p} y^{q} $ , 在 $ m_{00} $ 时, 这个因子等于 1 。.

  • 因此若图像为二值图(例如,所有像素都等于0或者1),则 $ m_{00} $ 代表图像上所有值非零的区域。当处理轮廓时,结果是轮廓的长度。
  • 将$m_{10}$和$m_{01}$相加再除以mo,能得到整个对象的平均x值和y值。

cv2.moments

计算多边形或光栅化形状的所有矩,最高可达三阶。

官方文档

  • 仅适用于来自 Python 绑定的轮廓矩计算: 注意,输入数组的 numpy 类型应该是 np.int32np.float32
  • 函数使用
1
2
3
4
5
cv2.moments(	
array[, # 单通道2D图像
binaryImage] # 如果为真,所有非零的图像像素将被视为1。该参数仅用于图像。
) ->
retval # 矩结果
  • retval 包含多组矩:
矩名称 含义
m00 零阶矩
m10, m01 一阶矩
m20, m11, m02 二阶矩
m30, m12, m21, m03 三阶矩
mu20, mu11, mu02 二阶中心距
mu30, mu21, mu12, mu03 三阶中心距
nu20, nu11, nu02 二阶归一化中心矩
nu30, nu21, nu12, nu03 三阶归一化中心矩
  • 示例代码
1
2
3
4
5
6
7
8
9
10
11
12
13
14
15
16
17
18
19
20
21
22
23
24
25
26
27
28
29
30
31
32
33
34
img = 255 - mt.cv_rgb_imread('conc.png', gray=True)
contours, hierarchy = cv2.findContours(img, cv2.RETR_TREE, cv2.CHAIN_APPROX_NONE)
res = np.zeros_like(img)
cv2.drawContours(res, [contours[0]], -1, [200], 3)
mom_res = cv2.moments(res, True)

-->
mom_res
{
'm00':5991.0
'm10':1325055.0
'm01':1749761.0
'm20':344323579.0
'm11':349473277.0
'm02':669951437.0
'm30':96933608139.0
'm21':85341328483.0
'm12':127841748675.0
'm03':288309060455.0
'mu20':51255518.07110667
'mu11':-37528819.78768152
'mu02':158907611.74194622
'mu30':-1894707829.496994
'mu21':1377304228.770937
'mu12':1587438731.2496796
'mu03':-182940816.065979
'nu20':1.428045313703228
'nu11':-1.0456016687269127
'nu02':4.4273724820231575
'nu30':-0.682015038155167
'nu21':0.49577152820752285
'nu12':0.571411100966244
'nu03':-0.06585099069469698
}
  • 计算第二个 Hu 不变矩测试归一化中心矩:

  • 公式为:

    $$ h_2=(v_{20}+v_{02})^2+4v_{11}^2 $$
  • 示例代码:

1
2
3
4
5
6
7
8
9
10
11
12
13
14
15
16
17
18
def h2(mom):
v20 = mom['nu20']
v02 = mom['nu02']
v11 = mom['nu11']
h2 = (v20 + v02) ** 2 + 4 * (v11 ** 2)
return h2

img = 255 - mt.cv_rgb_imread('conc.png', gray=True)
contours, hierarchy = cv2.findContours(img, cv2.RETR_TREE, cv2.CHAIN_APPROX_NONE)
res = np.zeros_like(img)
cv2.drawContours(res, [contours[0]], -1, [200], -1)
another_res = mt.image_resize(np.rot90(res), factor=0.5)
mom_res = cv2.moments(res, True)
mom_another_res = cv2.moments(another_res, True)

h2_1 = h2(mom_res)
h2_2 = h2(mom_another_res)
PIS([res, str(h2_1)], [another_res, str(h2_2)])

Hu 矩

cv2.HuMoments

函数用于计算 Hu 矩:

官方代码

  • 函数使用
1
2
3
4
5
cv2.HuMoments(	
moments[, # cv2.moments 函数的输出结果
hu]
) ->
hu # 输出 7 个 Hu 不变矩
  • 示例代码
1
2
3
4
5
6
7
8
9
10
11
12
13
14
15
16
17
18
19
20
21
22
23
24
25
26
27
28
29
30
31
img = 255 - mt.cv_rgb_imread('conc.png', gray=True)
contours, hierarchy = cv2.findContours(img, cv2.RETR_TREE, cv2.CHAIN_APPROX_NONE)
res = np.zeros_like(img)
cv2.drawContours(res, [contours[0]], -1, [200], -1)
another_res = mt.image_resize(np.rot90(res), factor=0.5)
mom_res = cv2.moments(res, True)
mom_another_res = cv2.moments(another_res, True)

hu_res = cv2.HuMoments(mom_res)
hu_another_res = cv2.HuMoments(mom_another_res)


-->

hu_res
array([[2.65472790e-01],
[3.67973951e-02],
[4.31746085e-03],
[1.65053925e-03],
[4.40583128e-06],
[3.16616604e-04],
[4.73966676e-08]])

hu_another_res
array([[2.65294556e-01],
[3.67252753e-02],
[4.27103909e-03],
[1.62915379e-03],
[4.29714551e-06],
[3.12207937e-04],
[5.03721607e-08]])

使用Hu矩进行匹配

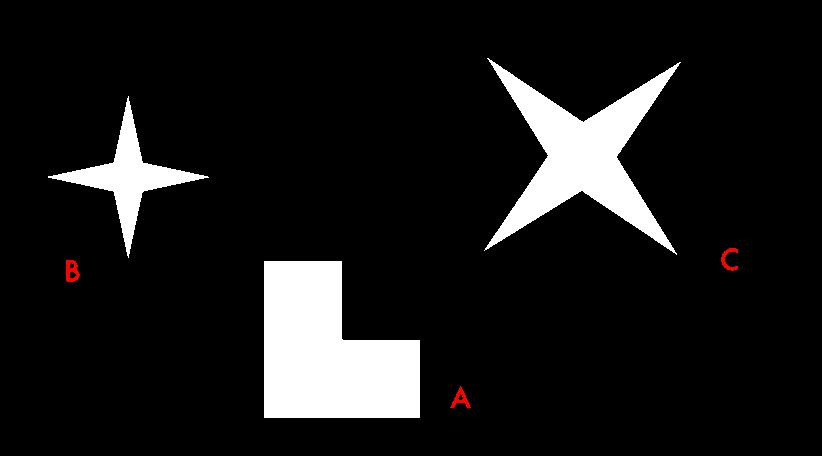
  • 我们想要使用Hu矩比较两个物体,并判定它们是否相似。对“相似”的定义可能有很多。为了使比较过程变得简单,OpenCV的函数cv2.matchShapes 允许我们简单提供两个物体,然后计算它们的矩,并根据我们提供的标准进行比较。

cv2.matchShapes

该函数比较两个形状,所有三个实现的方法都使用 Hu 不变量。

官方文档

  • 函数使用
1
2
3
4
5
6
7
cv2.matchShapes(	
contour1, # 第一个轮廓或灰度图像。
contour2, # 第二轮廓或灰度图像。
method, # 比对方法
parameter # 方法参数(OpenCV 4.5.5 暂时还不支持)
) ->
retval
  • method: ShapeMatchModes

    $A, B $分别表示两个输入的物体轮廓

    $$ \begin{array}{c} m_{i}^{A}=\operatorname{sign}\left(h_{i}^{A}\right) \cdot \log h_{i}^{A} \\ m_{i}^{B}=\operatorname{sign}\left(h_{i}^{B}\right) \cdot \log h_{i}^{B} \end{array} $$

    其中 $ h_{i}^{A}, h_{i}^{B} $ 为 $A,B$ 的 Hu 不变矩

    参数 含义
    cv2.CONTOURS_MATCH_I1 $ I_{1}(A, B)=\sum_ {i = 1 \ldots . } \left | \frac{1} {m_{i}^{A}}-\frac{1}{m_{i}^{B}}\right|$
    cv2.CONTOURS_MATCH_I2 $ I_{2}(A, B)= \sum_{ i=1 \ldots . } \left | m_{i} ^ {A}-m_{i}^{B}\right|$
    cv2.CONTOURS_MATCH_I3 $ I_{3}(A, B)=\max _{i=1 \ldots 7} \frac{\left|m_{i}^{A}-m_{i}^{B}\right|}{\left|m_{i}^{A}\right|} $
  • 示例代码 1

1
2
3
4
5
6
7
8
9
10
img = 255 - mt.cv_rgb_imread('conc.png', gray=True)
contours, hierarchy = cv2.findContours(img, cv2.RETR_TREE, cv2.CHAIN_APPROX_NONE)
res1 = np.zeros_like(img)
res2 = np.zeros_like(img)
cv2.drawContours(res1, [contours[0]], -1, [200], -1)
cv2.drawContours(res2, [contours[6]], -1, [200], -1)
another_res = mt.image_resize(np.rot90(res1), factor=0.5)
match_res1 = cv2.matchShapes(res1, another_res, cv2.CONTOURS_MATCH_I1, None)
match_res2 = cv2.matchShapes(res1, res2, cv2.CONTOURS_MATCH_I1, None)
PIS([res1, 'source img'], [another_res, f"match score {format(match_res1, '.3f')}"], [res2, f"match score {format(match_res2, '.3f')}"])

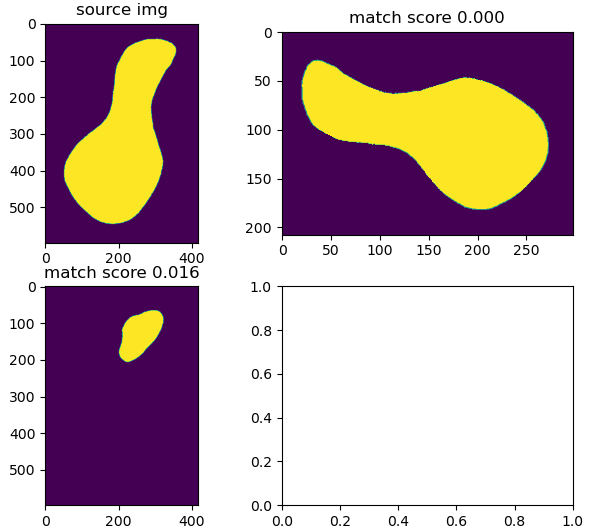
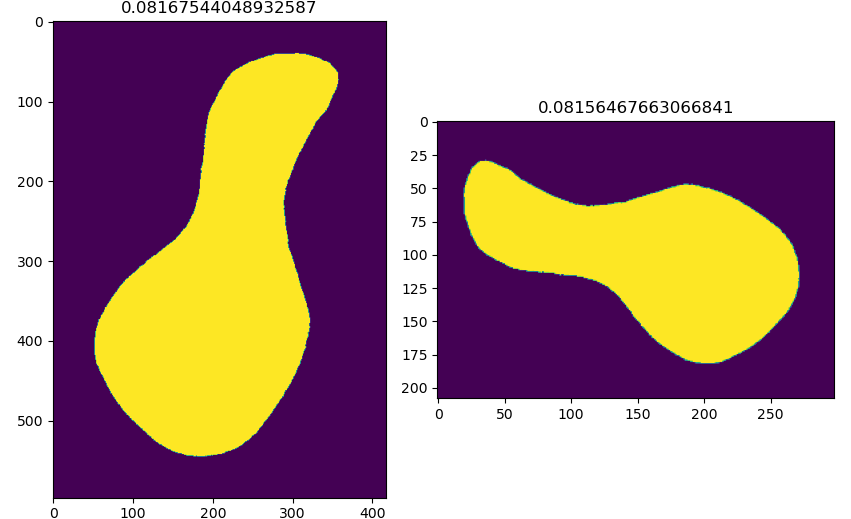
  • matchShapes 的结果值越小说明两个形状越接近,形状接近的图形匹配结果更接近 0
  • 示例代码 2

1
2
3
4
5
6
7
8
9
10
11
12
13
14
15
16
17
18
19
20
21
22
23
24
25
26
27
28
29
30
31
import numpy as np 
import cv2 as cv
import mtutils as mt

img = mt.cv_rgb_imread('shape.png')

img = img[:,:, 1]
_, thresh = cv.threshold(img, 0, 255, cv.THRESH_BINARY + cv.THRESH_OTSU)

contours, hierarchy = cv.findContours(thresh, 3, 2)
img_color = cv.cvtColor(thresh, cv.COLOR_GRAY2BGR) # 用于绘制的彩色图

cnt_a, cnt_b, cnt_c = contours[0], contours[1], contours[2]

reshape_a = cnt_a * 3
reshape_b = cnt_b * 7 + 100
reshape_c = cnt_c * 9 + 30

# 参数3:匹配方法;参数4:opencv预留参数

print('a,reshape_a = ',cv.matchShapes(cnt_a, reshape_a, 1, 0.0))
print('a,reshape_b = ',cv.matchShapes(cnt_a, reshape_b, 1, 0.0))
print('a,reshape_c = ',cv.matchShapes(cnt_a, reshape_c, 1, 0.0))

print('b,a = ',cv.matchShapes(cnt_b, cnt_a, 1, 0.0))
print('b,b = ',cv.matchShapes(cnt_b, cnt_b, 1, 0.0))
print('b,c = ',cv.matchShapes(cnt_b, cnt_c, 1, 0.0))

print('b,reshape_a = ',cv.matchShapes(cnt_b, reshape_a, 1, 0.0))
print('b,reshape_b = ',cv.matchShapes(cnt_b, reshape_b, 1, 0.0))
print('b,reshape_c = ',cv.matchShapes(cnt_b, reshape_c, 1, 0.0))
  • 输出结果
1
2
3
4
5
6
7
8
9
a,reshape_a =  5.46229728115577e-14
a,reshape_b = 0.4180663902715065
a,reshape_c = 0.4177273235721928
b,a = 0.41806639027150116
b,b = 0.0
b,c = 0.0003390666993161595
b,reshape_a = 0.4180663902715025
b,reshape_b = 5.329070518200751e-15
b,reshape_c = 0.00033906669930838795

缩放平移不改变形状匹配结果

利用形状场景方法比较轮廓

OpenCV 努力提供比矩匹配更好的形状匹配算法

https://docs.opencv.org/4.5.5/d1/d85/group__shape.html#ga1d058c5d00f6292da61422af2f3f4adc

  • 在 OpenCV 4.5.5 中还没有实现,有传说在 3.5 的版本中有相关函数

源码

https://github.com/zywvvd/Python_Practise/tree/master/OpenCV/Chapter 14

参考资料


文章链接:
https://www.zywvvd.com/notes/study/image-processing/opencv/opencv-contours-match/contours-match/


“觉得不错的话,给点打赏吧 ୧(๑•̀⌄•́๑)૭”

微信二维码

微信支付

支付宝二维码

支付宝支付

OpenCV 轮廓 —— 轮廓匹配
https://www.zywvvd.com/notes/study/image-processing/opencv/opencv-contours-match/contours-match/
作者
Yiwei Zhang
发布于
2022年4月28日
许可协议