本文最后更新于:2023年12月5日 下午

上一节中我们介绍了怎样定义PyTorch的模型,其中给出的示例都是用torch.nn中的层来完成的。这种定义方式易于理解,在实际场景下不一定利于使用。当模型的深度非常大时候,使用Sequential定义模型结构需要向其中添加几百行代码,使用起来不甚方便。

参考 深入浅出PyTorch ,系统补齐基础知识。

本节目录

  • 利用上一节学到的知识,将简单层构建成具有特定功能的模型块
  • 利用模型块构建复杂网络

对于大部分模型结构(比如ResNet、DenseNet等),我们仔细观察就会发现,虽然模型有很多层, 但是其中有很多重复出现的结构。考虑到每一层有其输入和输出,若干层串联成的”模块“也有其输入和输出,如果我们能将这些重复出现的层定义为一个”模块“,每次只需要向网络中添加对应的模块来构建模型,这样将会极大便利模型构建的过程。

本节我们将以U-Net为例,介绍如何构建模型块,以及如何利用模型块快速搭建复杂模型。

U-Net 简介

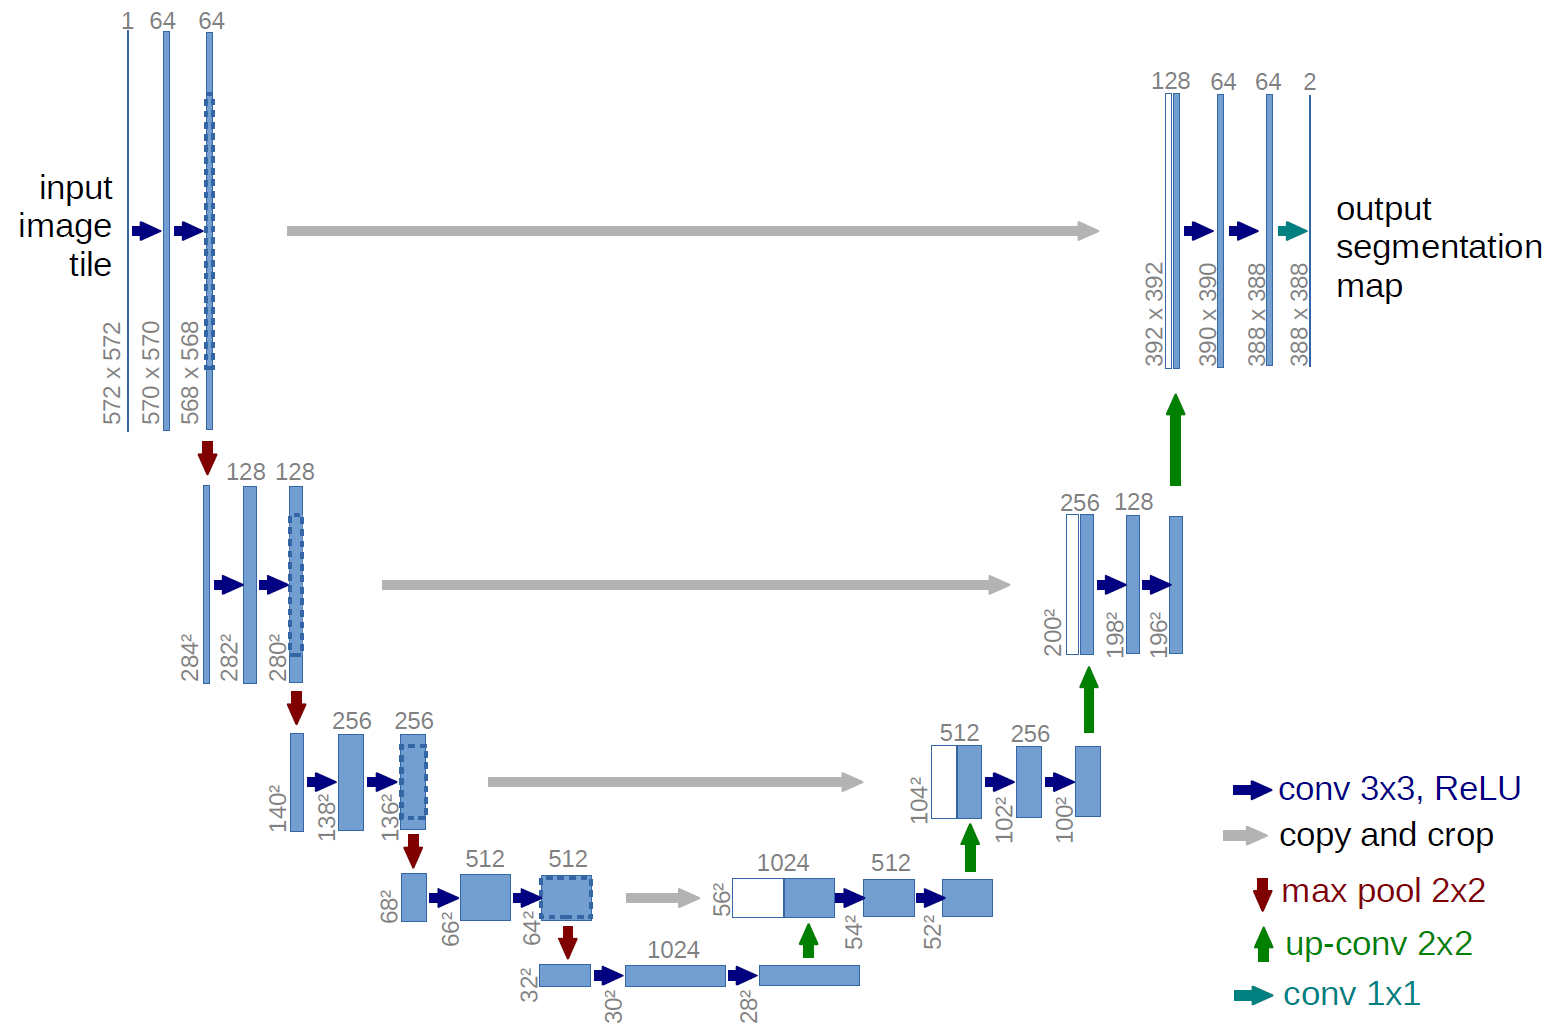
U-Net 是分割 (Segmentation) 模型的杰作,在以医学影像为代表的诸多领域有着广泛的应用。U-Net模型结构如下图所示,通过残差连接结构解决了模型学习中的退化问题,使得神经网络的深度能够不断扩展。

U-Net模型块分析

结合上图,不难发现U-Net模型具有非常好的对称性。模型从上到下分为若干层,每层由左侧和右侧两个模型块组成,每侧的模型块与其上下模型块之间有连接;同时位于同一层左右两侧的模型块之间也有连接,称为“Skip-connection”。此外还有输入和输出处理等其他组成部分。由于模型的形状非常像英文字母的“U”,因此被命名为“U-Net”。

组成U-Net的模型块主要有如下几个部分:

  • 每个子块内部的两次卷积(Double Convolution)
  • 左侧模型块之间的下采样连接,即最大池化(Max pooling)
  • 右侧模型块之间的上采样连接(Up sampling)
  • 输出层的处理

除模型块外,还有模型块之间的横向连接,输入和U-Net底部的连接等计算,这些单独的操作可以通过forward函数来实现。

下面我们用PyTorch先实现上述的模型块,然后再利用定义好的模型块构建U-Net模型。

U-Net模型块实现

在使用PyTorch实现U-Net模型时,我们不必把每一层按序排列显式写出,这样太麻烦且不宜读,一种比较好的方法是先定义好模型块,再定义模型块之间的连接顺序和计算方式。就好比装配零件一样,我们先装配好一些基础的部件,之后再用这些可以复用的部件得到整个装配体。

这里的基础部件对应上一节分析的四个模型块,根据功能我们将其命名为:DoubleConv, Down, Up, OutConv。下面给出U-Net中模型块的PyTorch 实现:

1
2
3
4
5
6
7
8
9
10
11
12
13
14
15
16
17
18
19
20
21
22
23
24
25
26
27
28
29
30
31
32
33
34
35
36
37
38
39
40
41
42
43
44
45
46
47
48
49
50
51
52
53
54
55
56
57
58
59
60
61
62
63
64
65
66
67
68
69
70
import torch
import torch.nn as nn
import torch.nn.functional as F
class DoubleConv(nn.Module):
"""(convolution => [BN] => ReLU) * 2"""

def __init__(self, in_channels, out_channels, mid_channels=None):
super().__init__()
if not mid_channels:
mid_channels = out_channels
self.double_conv = nn.Sequential(
nn.Conv2d(in_channels, mid_channels, kernel_size=3, padding=1, bias=False),
nn.BatchNorm2d(mid_channels),
nn.ReLU(inplace=True),
nn.Conv2d(mid_channels, out_channels, kernel_size=3, padding=1, bias=False),
nn.BatchNorm2d(out_channels),
nn.ReLU(inplace=True)
)

def forward(self, x):
return self.double_conv(x)

class Down(nn.Module):
"""Downscaling with maxpool then double conv"""

def __init__(self, in_channels, out_channels):
super().__init__()
self.maxpool_conv = nn.Sequential(
nn.MaxPool2d(2),
DoubleConv(in_channels, out_channels)
)

def forward(self, x):
return self.maxpool_conv(x)

class Up(nn.Module):
"""Upscaling then double conv"""

def __init__(self, in_channels, out_channels, bilinear=False):
super().__init__()

# if bilinear, use the normal convolutions to reduce the number of channels
if bilinear:
self.up = nn.Upsample(scale_factor=2, mode='bilinear', align_corners=True)
self.conv = DoubleConv(in_channels, out_channels, in_channels // 2)
else:
self.up = nn.ConvTranspose2d(in_channels, in_channels // 2, kernel_size=2, stride=2)
self.conv = DoubleConv(in_channels, out_channels)

def forward(self, x1, x2):
x1 = self.up(x1)
# input is CHW
diffY = x2.size()[2] - x1.size()[2]
diffX = x2.size()[3] - x1.size()[3]

x1 = F.pad(x1, [diffX // 2, diffX - diffX // 2,
diffY // 2, diffY - diffY // 2])
# if you have padding issues, see
# https://github.com/HaiyongJiang/U-Net-Pytorch-Unstructured-Buggy/commit/0e854509c2cea854e247a9c615f175f76fbb2e3a
# https://github.com/xiaopeng-liao/Pytorch-UNet/commit/8ebac70e633bac59fc22bb5195e513d5832fb3bd
x = torch.cat([x2, x1], dim=1)
return self.conv(x)

class OutConv(nn.Module):
def __init__(self, in_channels, out_channels):
super(OutConv, self).__init__()
self.conv = nn.Conv2d(in_channels, out_channels, kernel_size=1)

def forward(self, x):
return self.conv(x)

利用模型块组装U-Net

使用上面我们定义好的模型块,我们就可以非常方便地组装U-Net模型。可以看到,通过模型块的方式实现了代码复用,整个模型结构定义所需的代码总行数明显减少,代码可读性也得到了提升。

1
2
3
4
5
6
7
8
9
10
11
12
13
14
15
16
17
18
19
20
21
22
23
24
25
26
27
28
29
30
31
class UNet(nn.Module):
def __init__(self, n_channels, n_classes, bilinear=False):
super(UNet, self).__init__()
self.n_channels = n_channels
self.n_classes = n_classes
self.bilinear = bilinear

self.inc = DoubleConv(n_channels, 64)
self.down1 = Down(64, 128)
self.down2 = Down(128, 256)
self.down3 = Down(256, 512)
factor = 2 if bilinear else 1
self.down4 = Down(512, 1024 // factor)
self.up1 = Up(1024, 512 // factor, bilinear)
self.up2 = Up(512, 256 // factor, bilinear)
self.up3 = Up(256, 128 // factor, bilinear)
self.up4 = Up(128, 64, bilinear)
self.outc = OutConv(64, n_classes)

def forward(self, x):
x1 = self.inc(x)
x2 = self.down1(x1)
x3 = self.down2(x2)
x4 = self.down3(x3)
x5 = self.down4(x4)
x = self.up1(x5, x4)
x = self.up2(x, x3)
x = self.up3(x, x2)
x = self.up4(x, x1)
logits = self.outc(x)
return logits

参考资料


文章链接:
https://www.zywvvd.com/notes/study/deep-learning/pytorch/torch-learning/torch-learning-10/


“觉得不错的话,给点打赏吧 ୧(๑•̀⌄•́๑)૭”

微信二维码

微信支付

支付宝二维码

支付宝支付

PyTorch 学习 -10- 利用模型块快速搭建复杂网络
https://www.zywvvd.com/notes/study/deep-learning/pytorch/torch-learning/torch-learning-10/
作者
Yiwei Zhang
发布于
2023年7月23日
许可协议