本文最后更新于:2024年1月14日 晚上

异常检测在工业机器视觉中有着重要应用,本文介绍集成多个优秀异常检测算法的工具包 Anomalib 。

简介

  • Anomalib 包含最先进的异常检测算法,可在基准测试中实现最佳性能,并可现成使用。 此外,该库还提供组件来设计可针对特定需求量身定制的自定义算法。 其他工具,包括实验跟踪器、可视化器和超参数优化器,使设计和实施异常检测模型变得简单。

  • 考虑到可重复性和模块化,这个开源库提供了文献中的算法和一组工具,以通过即插即用的方法设计自定义异常检测算法。

  • 该库还支持 OpenVINO 模型优化和量化以进行实时部署。 总体而言,anomalib 是一个广泛的库,用于设计、实现和部署从数据到边缘的无监督异常检测模型。

主要特征

  • 最大的即用型深度学习异常检测算法和基准数据集的公共集合。
  • 基于 PyTorch Lightning 的模型实现,以减少样板代码并将实现工作限制在基本要素上。
  • 所有模型都可以导出到 OpenVINO 中间表示 (IR),以在英特尔硬件上进行加速推理。
  • 一组推理工具,用于快速轻松地部署标准或自定义异常检测模型

相关论文

代码仓库

工具架构

  • Anomalib 遵循四个设计原则:
原则 内容
再现性 anomalib 库的主要目标之一是比较不同最先进的异常检测算法在公共和自定义基准数据集上的性能。为了确保有效比较,anomalib 中的算法实现旨在重现原始出版物中报告的结果
可扩展性 鉴于异常检测领域的快速发展,以最小的努力将新算法添加到库中至关重要。为此,anomalib 提供了几个接口,开发人员可以实现这些接口,以使他们的模型与库的训练和推理入口点兼容。
模块化 该库包含几个现成的组件,可以在创建新算法时用作构建块。开发人员和研究人员可以以即插即用的方式重复使用这些组件,以进一步减少实施工作并快速原型化新想法。
实时性能 anomalib 的一个关键目标是减少使用经过训练的模型进行推理的工作量。因此,该库提供了接口,分别通过 PyTorch 和 OpenVINO 部署选项使用 GPU 或 CPU 实时部署模型。
  • 通过遵循上述设计原则,anomalib 旨在涵盖从数据到部署的整个机器学习模型生命周期,其中可以复制现有算法的结果,可以添加新的数据集和算法

工具安装

安装环境

当前(2022.8) anomalib 需要 pytorch 1.11 + 版本,如果当前环境中有其他版本 pytorch 建议在新的环境中安装

  • 本地安装有两种方式,分别为 pypi 安装和 源码安装
pypi
1
pip install anomalib
源码
1
2
3
git clone https://github.com/openvinotoolkit/anomalib.git
cd anomalib
pip install -e .
  • 事实上在刚刚使用这个工具时必须要下载源码,而 pypi 的代码又包含在源码中,因此建议在学习工具使用或刚开始训练、测试模型时建议使用 源码安装 的方式,当模型涉及到部署时再用 pypi 包安装

工具使用

  • 初始接触 anomalib 工具强烈建议下载源码调试运行
1
git clone https://github.com/openvinotoolkit/anomalib.git

源码结构

  • 仓库代码结构
1
2
3
4
5
6
7
8
9
10
11
12
13
14
15
16
17
18
19
20
21
22
23
24
25
26
27
28
29
30
31
32
33
34
35
36
37
38
39
40
41
42
43
44
45
46
47
48
49
50
51
52
53
54
55
56
57
58
59
60
61
62
63
64
├─anomalib									# anomalib 核心文件
│ ├─config
│ ├─data
│ │ └─utils
│ │ └─generators
│ ├─deploy
│ │ └─inferencers
│ ├─models
│ │ ├─cflow
│ │ ├─components
│ │ │ ├─base
│ │ │ ├─dimensionality_reduction
│ │ │ ├─feature_extractors
│ │ │ ├─filters
│ │ │ ├─freia
│ │ │ │ ├─framework
│ │ │ │ └─modules
│ │ │ ├─layers
│ │ │ ├─sampling
│ │ │ └─stats
│ │ ├─dfkde
│ │ ├─dfm
│ │ ├─draem
│ │ │ └─utils
│ │ ├─fastflow
│ │ ├─ganomaly
│ │ ├─padim
│ │ ├─patchcore
│ │ ├─reverse_distillation
│ │ │ └─components
│ │ └─stfpm
│ ├─post_processing
│ │ └─normalization
│ ├─pre_processing
│ │ └─transforms
│ └─utils
│ ├─callbacks
│ │ ├─nncf
│ │ └─visualizer
│ ├─cli
│ ├─loggers
│ ├─metrics
│ └─sweep
│ └─helpers
├─configs # 默认配置文件
│ └─model
├─docs # 文档
├─notebooks
├─requirements # 依赖库
├─results # 我的运行结果
│ ├─fastflow
│ │ └─mvtec
│ │ └─linescan_ref
│ │ ├─images
│ │ │ ├─good
│ │ │ └─ng
│ │ └─weights
├─tests
└─tools # 训练、测试入口
├─benchmarking
│ └─utils
├─hpo
│ └─utils
└─inference
  • anomalib 中的代码不要修改

训练模型

  • 当前异常检测比较权威、常用的数据集是 MVTec ,大多数配置文件默认数据集也是这个
数据集准备
  • 比较方便的准备方式是将自己的数据整理成 MVTec 的数据格式

    以我的数据为例

    1
    2
    3
    4
    5
    6
    7
    8
    MyData
    ├─ground_truth
    │ └─ng
    ├─test
    │ ├─good
    │ └─ng
    └─train
    └─good
  • 这样我就有了名为 MyData 的自己的训练集

选择模型
  • 当前工具支持模型:
  • 选一个自己喜欢的模型吧,我们以 parchcore 为例,然后找到 anomalib/models/parchcore/config.yaml 作为自己的配置文件
  • 建议复制出来修改使用,将其放在 configs/my_models 文件夹中
  • 修改需要调整的内容,一般包括数据集路径数据类型名称图像尺寸backbone模型参数
  • 调整好运行 tools/train.py 文件,加上自己配置文件作为参数
1
python tools/train.py --config <path/to/model/config.yaml>
  • 我直接改了代码的默认参数,也是可以的
1
2
3
4
5
6
7
8
9
10
11
12
13
def get_args() -> Namespace:
"""Get command line arguments.

Returns:
Namespace: List of arguments.
"""
parser = ArgumentParser()
parser.add_argument("--model", type=str, default="fastflow", help="Name of the algorithm to train/test")
parser.add_argument("--config", type=str, default="configs/model/fastflow_raw.yaml", help="Path to a model config file")
parser.add_argument("--log-level", type=str, default="INFO", help="<DEBUG, INFO, WARNING, ERROR>")

args = parser.parse_args()
return args
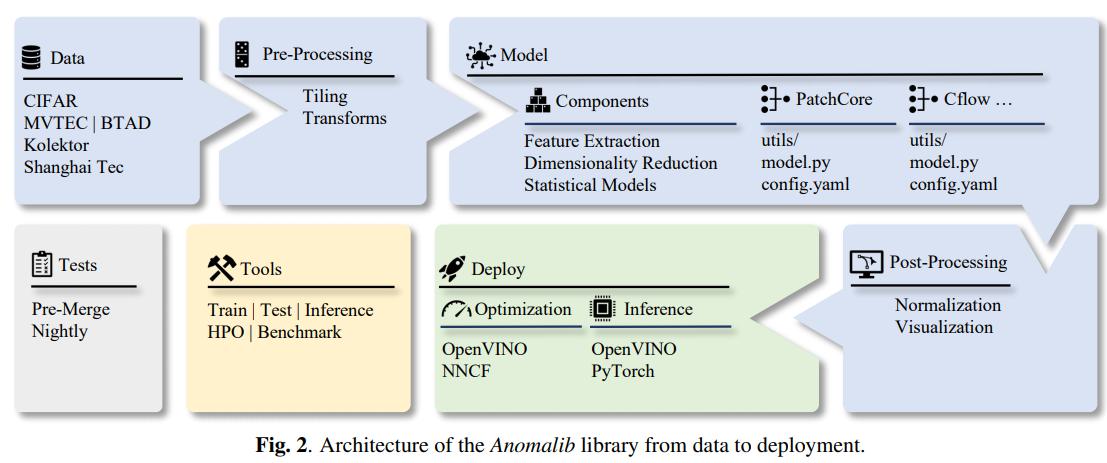
  • 工具会自动执行数据预处理加载训练测试评估等操作
1
2
3
4
5
6
7
8
9
10
11
LOCAL_RANK: 0 - CUDA_VISIBLE_DEVICES: [0,1,2,3]
Testing DataLoader 0: 0%| | 0/141 [00:00<?, ?it/s]QStandardPaths: XDG_RUNTIME_DIR not set, defaulting to '/tmp/runtime-root'
failed to get the current screen resources
Testing DataLoader 0: 100%|████████████████████████████████████████████████████████████████████████████████████████████████████████████████████████████| 141/141 [00:39<00:00, 3.54it/s]
─────────────────────────────────────────────────────────────────────────────────────────────────────────────────────────────────────────────────────────────────────────────────────────
Test metric DataLoader 0
─────────────────────────────────────────────────────────────────────────────────────────────────────────────────────────────────────────────────────────────────────────────────────────
image_AUROC 1.0
image_F1Score 0.994535505771637
pixel_AUROC 0.9919205904006958
pixel_F1Score 0.556056797504425
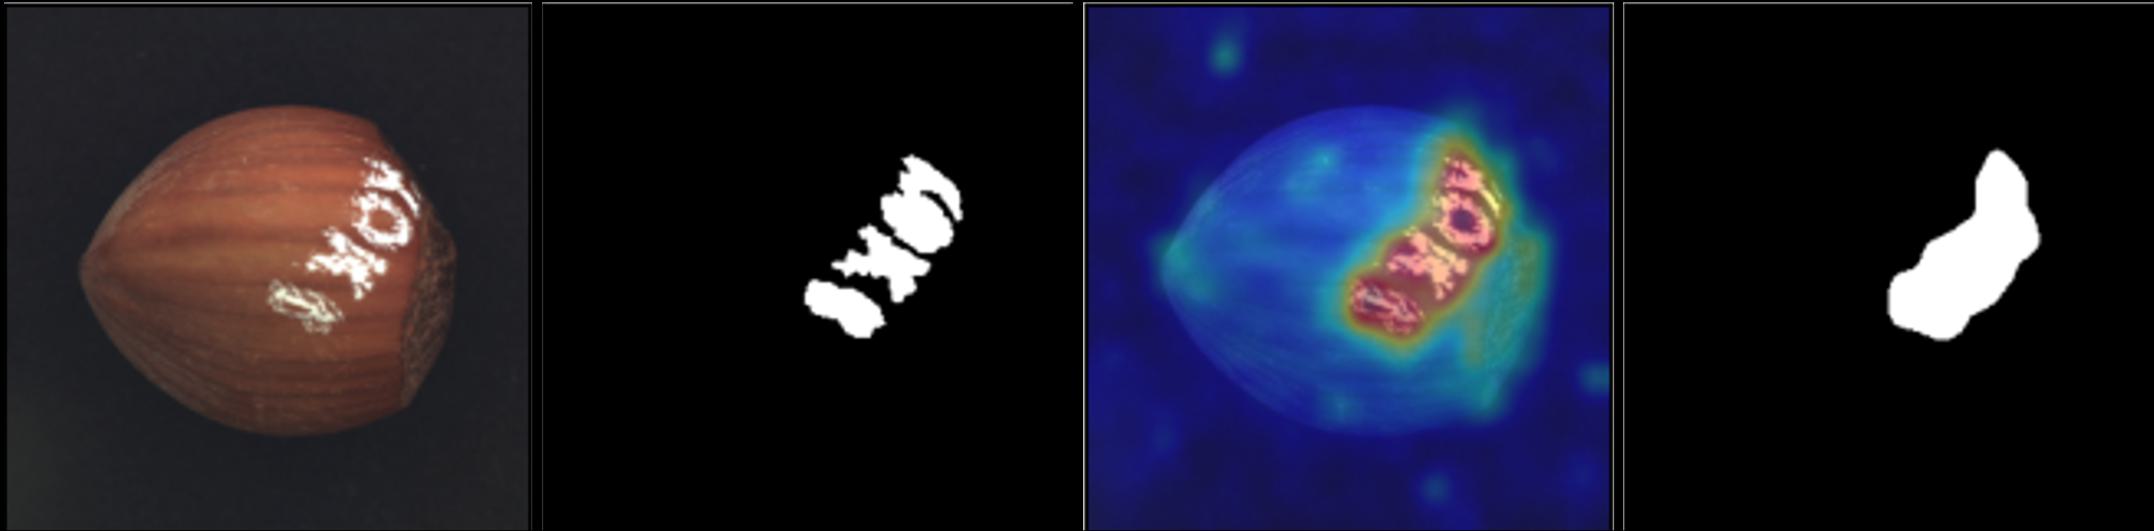
  • 在输出路径中保存了输出测试图像和模型权重

模型部署

  • 当选好模型后需要独立部署时,需要在系统安装 anomalib 工具包

  • 可以省去很多繁琐的流程自己构建模型、预处理流程、加载模型流程建立 Controller

  • 例如 Patchcore 的模型加载可以简化为:

1
2
3
4
5
6
7
8
9
10
11
12
13
14
15
16
def get_model(self, config_path, model_path):
config = OmegaConf.load(config_path)
model = Patchcore(
input_size=tuple(config.dataset.image_size),
backbone=config.model.backbone,
layers=config.model.layers,
pre_trained=False,
coreset_sampling_ratio=config.model.coreset_sampling_ratio,
num_neighbors=config.model.num_neighbors,
)
weight = load(model_path)
print(f"loading Patchcore model from path {model_path}.")
load_res = model.load_state_dict(weight["state_dict"], strict=False)
print(f"Patchcore model loaded: {load_res}")
model.threshold = model.image_threshold.value.cpu()
return model
  • 记得运行
1
model.eval()

参考资料


文章链接:
https://www.zywvvd.com/notes/study/deep-learning/anomaly-detection/nomalib/nomalib/


“觉得不错的话,给点打赏吧 ୧(๑•̀⌄•́๑)૭”

微信二维码

微信支付

支付宝二维码

支付宝支付

异常检测工具包 Anomalib
https://www.zywvvd.com/notes/study/deep-learning/anomaly-detection/nomalib/nomalib/
作者
Yiwei Zhang
发布于
2022年9月1日
许可协议