本文最后更新于:2024年5月17日 下午
之前介绍了镜头畸变,本文记录校正畸变的模型和方法。
背景
- 对于常见的镜头径向畸变和切向畸变,在硬件已经无法继续优化时,需要后处理进行校正
模型
一些针孔摄像机会对图像产生严重的畸变,主要有两种畸变: 径向畸变和切向畸变。
径向畸变

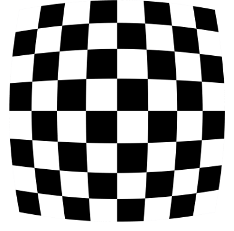
- 径向畸变导致直线看起来弯曲。点距图像中心越远,径向畸变越大。例如,下图显示了一个棋盘的两个边缘用红线标记的图像。但是,你可以看到棋盘的边界不是一条直线,与红线不匹配。所有预期的直线都凸出。

- 径向畸变可以表示为以下模型
切向畸变
- 类似地,切向畸变发生是因为摄像透镜没有与成像平面完全平行。因此,图像中的某些区域看起来可能比预期的要近。切向扭曲的数量可表示如下:
叠加畸变
利用上面两组式子就可对畸变进行较好的修正。同时对径向、切向畸变消除就是将两组式子合并。
$$ \begin{aligned} x_{\text {distorted }} & =x\left(1+k_{1} r^{2}+k_{2} r^{4}+k_{3} r^{6}\right)+2 p_{1} x y+p_{2}\left(r^{2}+2 x^{2}\right) \\ y_{\text {distorted }} & =y\left(1+k_{1} r^{2}+k_{2} r^{4}+k_{3} r^{6}\right)+p_{1}\left(r^{2}+2 y^{2}\right)+2 p_{2} x y\end{aligned} $$自变量为理想坐标,等式左边的结果为畸变坐标,反过来该公式不成立。
畸变系数
- 简而言之,我们需要找到五个参数,即畸变系数:
$$
Distortion ; coefficients=(k_1 \hspace{10pt} k_2 \hspace{10pt} p_1 \hspace{10pt} p_2 \hspace{10pt} k_3)
$$
相机参数
- 除了畸变模型参数之外,还需要一些其他的信息,比如相机的内部参数和外部参数。
内参
- 摄像机的固有参数是特定的。它们包括像焦距 $(f_x,f_y)$和光学中心 $(c_x,c_y)$ 这样的信息。所述焦距和光学中心可用于创建摄像机矩阵,该矩阵可用于消除由于特定摄像机的镜头而产生的畸变。相机矩阵对于特定的相机来说是独一无二的,所以一旦计算出来,就可以在同一个相机拍摄的其他图像上重复使用。它表示为一个 $3 \times 3$ 的矩阵:
外参
-
外部参数对应于将 3D 点的坐标转换为坐标系的旋转和平移向量。
-
为了找到这些参数,我们必须提供一些定义良好的示例图像(例如棋盘)。如果已经知道相对位置的特定点(例如棋盘上的方角),并且知道这些点在真实空间中的坐标,也知道图像中的坐标,在这种情况下就可以求出畸变系数。
为了获得更好的结果,至少需要10组对应点的数据。
cv2.calibrateCamera
OpenCV 库有相机畸变矫正的函数,官方文档
-
函数用法:
1
2
cv2.calibrateCamera(objectPoints, imagePoints, imageSize, cameraMatrix, distCoeffs[, rvecs[, tvecs[, flags[, criteria]]]]
-> retval, cameraMatrix, distCoeffs, rvecs, tvecs -
输入参数说明:
objectPoints:真实世界中标定板上点的坐标,期望是一个(n, 3)形状的Numpy数组,其中n是标定板上点的总数。imagePoints:图像中标定板上点的坐标,期望是一个(n, 2)形状的Numpy数组。imageSize:图像的大小,一个(height, width)形状的元组。camera_matrix:相机的内参矩阵,一个(3, 3)形状的Numpy数组。如果设置为None,则默认相机的内参矩阵则迭代计算初始值为单位矩阵。dist_coeffs:畸变系数,一个(5,)形状的Numpy数组 (k1, k2, p1, p2, k3)。如果设置为None,则默认迭代计算初始值为0。flags:标定过程中的 flags,通常设置为cv2.CALIB_USE_INTRINSIC_GUESS,表示使用初始的内参矩阵猜测值。
-
输出参数说明:
retval:是一个 double 值,官方文档没有介绍,有一种说法是重投影误差的某种统计量(存疑)。camera_matrix:这是相机内参矩阵,包含了相机的焦距(fx 和 fy)和主点(cx 和 cy)。内参矩阵是相机投影模型的数学表示,它定义了相机如何将三维空间中的点投影到二维图像平面上。dist_coeffs:这是畸变系数,它是一个包含畸变参数的向量,包括畸变系数(k1, k2, p1, p2, k3)。这些系数可以用来校正镜头畸变,使得图像的边缘更加直线。rvecs(旋转向量)和tvecs(平移向量):这些参数表示相机在世界坐标系中的旋转和平移。rvecs是一个包含旋转角度的向量,而tvecs是一个包含平移向量的向量。这些参数允许你了解相机在标定过程中相对于世界坐标系的位置和方向变化。
计算过程
- 初始化内参矩阵和畸变系数:如果
camera_matrix和dist_coeffs没有被指定,cv2.calibrateCamera会使用单位矩阵和全零数组作为初始猜测值。 - 最小化重投影误差:函数会尝试找到最优化的内参矩阵和畸变系数,使得所有图像中标定板上点的重投影误差之和最小。这通常通过非线性优化算法(如 Levenberg-Marquardt 算法)来实现。
- 计算校正后的图像大小:根据优化后的内参矩阵,计算出校正后的图像大小,这有助于后续的图像裁剪。
- 返回结果:函数返回优化后的内参矩阵、畸变系数、旋转向量(表示相机在世界坐标系中的旋转)和平移向量(表示相机在世界坐标系中的平移)。
完成标定后,你可以使用 cv2.undistort 函数和计算出的内参矩阵及畸变系数来对图像进行畸变校正。校正后的图像会尽可能地减少由于镜头畸变导致的图像扭曲。
Python 实现
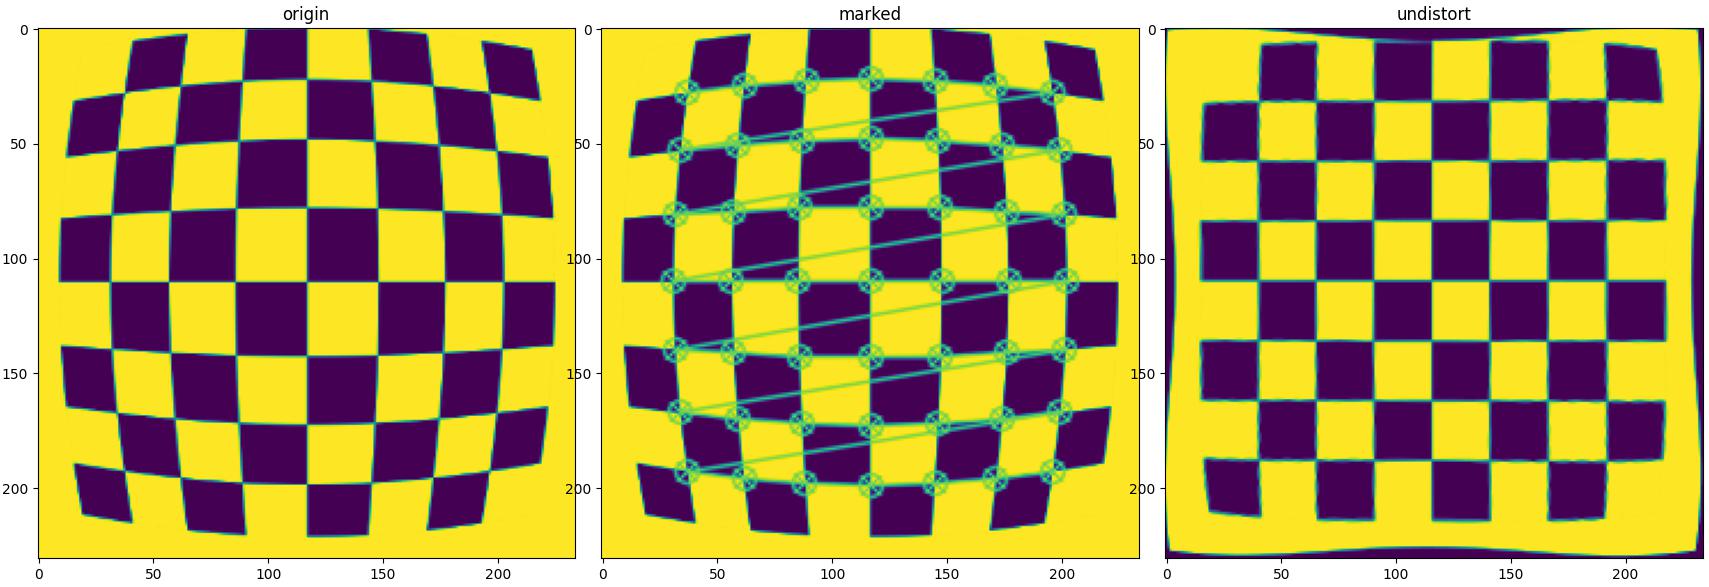
- 测试图像:
可以直接下载图像,命名为
undistort.png
-
示例代码(需要安装 vvdutils)
1
pip install vvdutils -
核心步骤使用 OpenCV 库实现
1 | |
- 配置好图像,运行程序可以看到标记的图和校正结果
- 使用映射矩阵直接映射得到矫正图像结果,速度可以快十几倍
封装 distortion_calibration
上述功能已经封装到 vvdutils 的 distortion_calibration 函数中
参数说明
-
函数输入:
- 标定板图像文件夹路径(图像尺寸要相同)
- 标定板横向、纵向点个数
-
输出结果字典:
-
相机内参 mtx
-
畸变系数(f1, f2, p1, p2, f3) dist
-
图像宽度 W
-
图像高度 H
过程中输出不可用图像信息
打印结果信息
输出每张有效图像的重投影误差,如果误差超过0.1则打印图像路径
-
示例代码
1 | |
封装 distortion_calibration_to_map
如果需要转换矩阵,可以用 distortion_calibration的结果调用 distortion_calibration_to_map 接口生成:
1 | |
封装 undistort_with_map_result
之后可以使用 undistort_with_map_result 通过输入 图像 和 result 完成图像去畸变
1 | |
C++ 实现
1 | |
- image watch 中显示的矫正结果

参考资料
-
https://www.zywvvd.com/notes/study/camera-imaging/photo-distortion/photo-distortion/
-
https://docs.opencv.org/4.x/d9/d0c/group__calib3d.html#ga687a1ab946686f0d85ae0363b5af1d7b
-
https://docs.opencv.org/4.x/dc/dbb/tutorial_py_calibration.html
文章链接:
https://www.zywvvd.com/notes/study/camera-imaging/distort-corr/distort-corr/
“觉得不错的话,给点打赏吧 ୧(๑•̀⌄•́๑)૭”

微信支付

支付宝支付