1
2
3
4
5
6
7
8
9
10
11
12
13
14
15
16
17
18
19
20
21
22
23
24
25
26
27
28
29
30
31
32
33
34
35
36
37
38
39
40
41
42
43
44
45
46
47
48
49
50
51
52
53
54
55
56
57
58
59
60
61
62
63
64
65
66
67
68
69
70
71
72
73
74
75
76
77
78
79
80
81
82
83
84
85
86
87
88
89
90
91
92
93
94
95
96
97
98
99
100
101
102
103
104
105
106
107
108
109
110
111
112
113
114
115
116
117
118
119
120
121
122
123
124
125
126
127
128
129
130
131
132
133
134
135
136
137
138
139
140
141
142
143
144
145
146
147
148
149
150
151
152
153
154
155
156
157
158
159
160
161
162
163
164
165
166
167
168
169
170
171
172
173
174
175
176
177
178
179
180
181
182
183
184
185
186
187
188
189
190
191
192
193
194
195
196
197
198
199
200
201
202
203
204
205
206
207
208
209
210
211
212
213
214
215
216
217
218
219
220
221
222
223
224
225
226
227
228
229
230
231
232
233
234
235
236
237
238
239
240
241
242
243
244
245
246
247
248
249
250
251
252
253
254
255
256
257
258
259
260
261
262
263
264
265
266
267
268
269
270
271
272
273
274
275
276
277
278
279
280
281
282
283
284
285
286
287
288
289
290
291
292
293
294
295
296
297
298
299
300
301
302
303
304
305
306
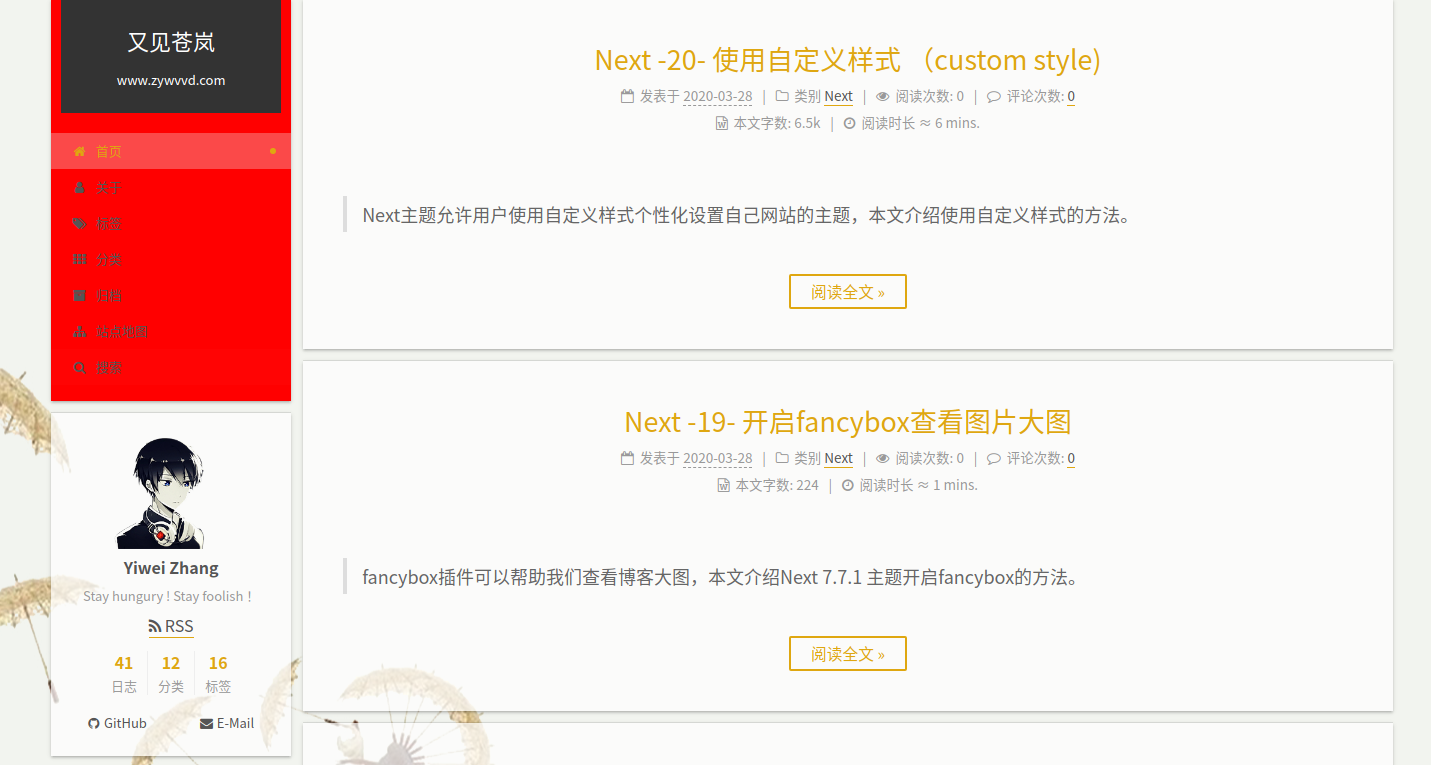
| // Custom styles.
// 网站最顶部条线的颜色
.headband {
height: 0px;
background: #F2F4EF;
}
// 设置背景图片
body{
background:url(/images/bg.png);
background-repeat:no-repeat;
background-attachment:fixed;
background-position:center;
}
// 设置侧边栏左上角网站标题和副标题区颜色
.site-meta {
background: #222222;
}
// 设置侧边栏网站标题样式
.site-title {
color:#fff;
}
// 设置侧边栏网站标题鼠标悬浮样式
.site-title:hover {
letter-spacing: 0.4rem;
}
// 侧边栏网站副标题样式
.site-subtitle {
color:#fff;
}
.site-author-image{
border: 0px;
}
// 文章标题鼠标悬浮下划线样式
.posts-expand .post-title-link::before {
content: "";
position: absolute;
width: 100%;
height: 2px;
bottom: 0;
left: 0;
background-color: #DfA710;
visibility: hidden;
transform: scaleX(0);
transition-duration: 0.2s;
transition-timing-function: ease-in-out;
transition-delay: 0s;
}
// 文章标题颜色
.posts-expand .post-title-link {
color:#DfA710;
}
// 阅读全文按钮样式
.btn {
border:2px solid #DfA710;
color:#DfA710;
}
// 阅读全文按钮鼠标悬浮样式
.btn:hover {
border-color: #DfA710;
color: #fff;
background: #DfA710;
}
// 设置文章和侧边栏中链接样式
a:hover,
span.exturl:hover {
color: #DfA710;
border-bottom-color: #DfA710;
}
// 修改文章页侧边栏文章目录下面的第一个标题的鼠标悬浮样式
// 真的有毒,文章目录第一个标题的样式还是单独设置的...一开始还没发现
.post-toc .nav .active-current > a:hover {
color: #DfA710;
}
// 文章页面左边文章标题颜色
.post-toc ol a:hover {
color: #DfA710;
border-bottom-color: #DfA710;
}
// 文章页面左边文章标题active时颜色
.post-toc .nav .active > a {
color: #DfA710;
border-bottom-color: #DfA710;
}
// 文章页侧边栏文章目录和站点概况鼠标悬浮样式
.sidebar-nav li:hover {
color: #DfA710;
}
// 文章页侧边栏文章目录和站点概况active时鼠标悬浮样式
.sidebar-nav .sidebar-nav-active:hover {
color: #DfA710;
}
// 文章页侧边栏文章目录和站点概况active时样式
.sidebar-nav .sidebar-nav-active {
color: #DfA710;
border-bottom-color: #DfA710;
}
// 社交栏鼠标悬浮样式
#sidebar div.links-of-author.motion-element a:hover {
color: #DfA710;
background: rgba(255, 255, 255, 0);
}
// 友链鼠标悬浮样式
.sidebar a:hover,
.sidebar span.exturl:hover {
border-bottom-color: #DfA710;
color: #DfA710;
}
// RSS文字颜色
//#sidebar div.feed-link.motion-element > a {
// color: #DfA710;
//}
// RSS图标颜色
//#sidebar div.feed-link.motion-element > a i{
// color: #DfA710;
//}
// 侧边栏日志、分类、标签 上面的数字的颜色
.site-state-item-count {
color: #DfA710;
}
// 设置底部文章分页数字鼠标悬浮上划线颜色
.pagination .prev:hover,
.pagination .next:hover,
.pagination .page-number:hover {
border-top-color: #DfA710;
}
// 设置文章页上一篇文章和下一篇文章鼠标悬浮样式
.post-nav-item a:hover {
color: #DfA710;
border-bottom: none;
}
// 修改鼠标选中字符的颜色
::selection {
background: #DfA710;
color: #f7f7f7;
}
::-moz-selection {
background: #DfA710;
color: #f7f7f7;
}
// 侧边栏返回顶部按钮鼠标悬浮样式
.back-to-top:hover {
background: #eee;
color: #DfA710;
}
// 当页面处于 首页、标签、分类、归档、关于页面其中之一时,处于哪个页面哪个选项就变蓝
#menu > li.menu-item-active > a {
color: #DfA710;
}
// 侧边栏导航小圆点颜色
.menu-item-active a:after,
.menu .menu-item a:hover:after,
.menu .menu-item span.exturl:hover:after {
background-color: #DfA710;
}
// 侧边栏上半部分设置为透明
.menu-item-active a,
.menu .menu-item a:hover,
.menu .menu-item span.exturl:hover {
background: rgba(242, 242, 242, 0.30);
border-bottom-color: rgba(255, 255, 255, 0.2);;
}
// 侧边栏下半部分设置为透明
.sidebar{
background: rgba(255, 255, 255, 0.0);
}
.sidebar-inner{
background: rgba(255, 255, 255, 0.2);
}
// 设置底部文章分页部分为透明
.pagination{
background: rgba(255, 255, 255, 0.0);
}
.pagination .page-number.current {
color: #fff;
background: #DfA710;
}
// 导航栏底部百分比透明
.back-to-top,
.back-to-top:hover
{
background: rgba(255, 255, 255, 0.3);
}
// 设置文章背景透明度
.post-block{
background: rgba(255, 255, 255, 0.2);
}
// 这里需要完全透明,不然就会在上面的0.2基础上再进行透明度计算
.btn{
background: rgba(255, 255, 255, 0);
}
.header-inner{
background: rgba(255, 255, 255, 0.2);
}
.main-inner {
background: rgba(255, 255, 255, 0.2);
}
.site-brand-container
{
background: #222222;
}
// 代码区背景
.table-container{
background: rgba(240, 240, 222, 0.2);
}
.table-container :hover {
background: rgba(237,237, 225, 0.03);
}
// 代码背景
table > tbody > tr:nth-of-type(odd) {
background-color: rgba(255, 255, 255, 0.0);
}
table > tbody > tr:hover {
background-color: rgba(233,230, 230, 0.0);
}
pre,
.highlight {
background: rgba(200, 31, 33, 0);
}
//代码行标背景
.highlight .gutter pre {
background: rgbargba(227, 235, 227, 0.3);
}
.highlight .code pre {
background: rgba(29, 31, 100, 0);
}
// 评论
.comments {
background: rgba(255, 255, 255, 0.2);
}
// 文章页内作者信息
.post-copyright {
border-left: 3px solid #DfA710;
background: rgba(255, 255, 255, 0.3);
}
code {
color: #FFFFFF;
background: rgba(239, 183, 48, 0.4);
margin: 2px;
border: 0px solid #DfA710;
}
// 底部动态的叶子图标
.with-love{
color: red;
}
// 去掉文章白色背景
.main-inner {
background: rgba(255,255,255,0.0);
}
// 标签页链接下划线颜色
a,
span.exturl {
border-bottom: 1px solid #DfA710;
}
// 标签页链接鼠标悬浮颜色
.tag-cloud a:hover {
color: #DfA710 !important;
}
|
